
Think “warm coat and boots” will keep you safe at 4,000 meters?
Think again.
High-altitude cold climates change fast: sun, wind, and a 15°C swing can hit in one afternoon.
Layering, insulated boots, freeze-proof hydration, strong sun protection, and simple backups are non-negotiable.
This Packing List for High-Altitude Cold Climates gives the essential gear to stay warm, dry, and functional.
I’ll give clear choices, rules of thumb, and a checklist you can pack from tonight.
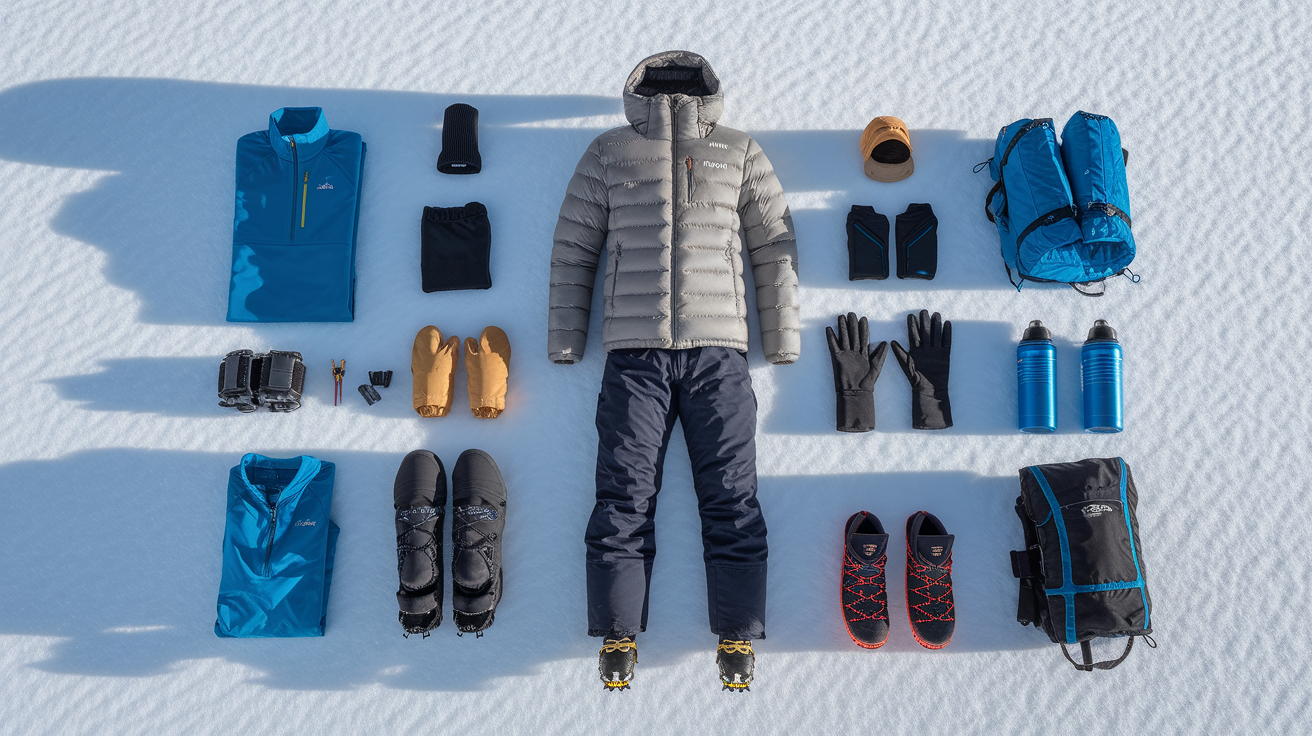
Essential Gear Overview for High-Altitude Cold Climate Packing
High-altitude cold environments throw rapid temperature swings, brutal wind, and intense UV exposure at you in the same afternoon. At 3,000 meters, morning sun can warm you to 10°C, then a cloud rolls in and the thermometer drops to −5°C in minutes. Wind at altitude strips heat faster than still air at sea level, and UV radiation increases roughly 10% per 1,000 meters of elevation gain. Layering isn’t optional. It’s the only system that lets you adjust quickly enough to stay warm, dry, and functional through these swings.
Your packing list centers on three clothing layers (base, mid, outer), specialized footwear with traction devices, and a sleep system rated for the coldest night you’ll face. Beyond clothing, altitude demands insulated hydration systems that won’t freeze, sun protection that accounts for reflected glare off snow, and monitoring tools to track acclimatization. Pack for the extremes, not the averages. Nights at 4,500 meters regularly hit −20°C even when daytime temps feel comfortable.
Cold-climate mountain travel also requires backup plans for every critical system. If your hydration bladder freezes, you need bottles stored inside your jacket. If your gloves get wet, you need dry spares. Every piece of gear should answer the question: “What happens if this fails at 5,000 meters in a storm?”
Complete High-Altitude Cold Climate Gear Overview:
- Base layer: 2–3 sets merino or synthetic thermals (150–260 g/m²)
- Midlayer: fleece jacket for trekking, down jacket (600–900 fill) for camp
- Outer shell: waterproof breathable jacket and pants, sized to fit over layers
- Insulated pants: nylon/polyester with fleece or down lining
- Glove system: liners, waterproof shells, insulated mittens
- Footwear: insulated mountaineering boots plus crampons or microspikes
- Sleep system: sleeping bag rated −10°C to −30°C, insulated pad R-value 4.5+
- Sun protection: glacier glasses, SPF 30+ broad-spectrum sunscreen, wide-brim hat
- Hydration: 2–3 L insulated bottles or bladder plus 1 L thermos
- Safety and emergency: pulse oximeter, first-aid kit, emergency shelter, satellite messenger
Base Layer Systems for High-Altitude Cold Climate Trips
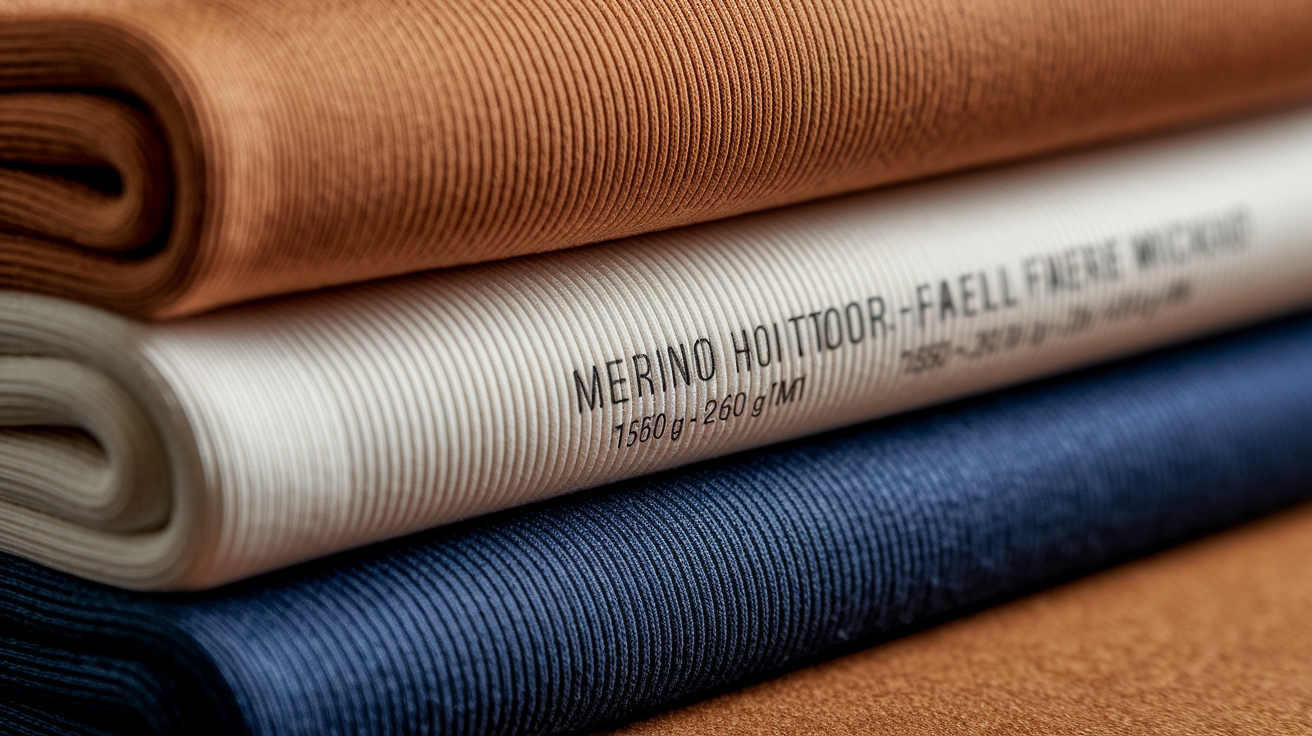
Merino wool and synthetic fabrics dominate high-altitude base layers because they wick moisture away from skin, dry reasonably fast, and regulate temperature across a wide range. Merino resists odor for multi-day wear and feels comfortable against skin even when damp. Synthetics dry faster and cost less, but smell worse after a day of hard trekking. Midweight merino (150–260 g/m²) handles most cold-weather trekking from 0°C down to −15°C when you pair it with proper mid and outer layers.
Pack 2–3 complete base layer sets. Tops and bottoms. You’ll have a dry set for sleeping and at least one spare if conditions soak your layers. Wear one set during the day, switch to dry thermals at night to stay warm in your sleeping bag, and rotate through as needed.
Fit matters. Base layers should sit snug but not tight, with enough room to move freely without bunching under other clothing. Avoid cotton entirely. It holds moisture, loses all insulation when wet, and takes forever to dry in cold mountain air.
Key Base Layer Selection Criteria:
- Fabric weight: 150–260 g/m² merino or synthetic for subzero conditions
- Moisture wicking: pulls sweat away from skin to keep you dry
- Odor control: merino naturally resists smell, synthetics require treatment
- Drying speed: synthetics dry faster, merino balances comfort and performance
Midlayer and Insulation Choices for Alpine Temperatures
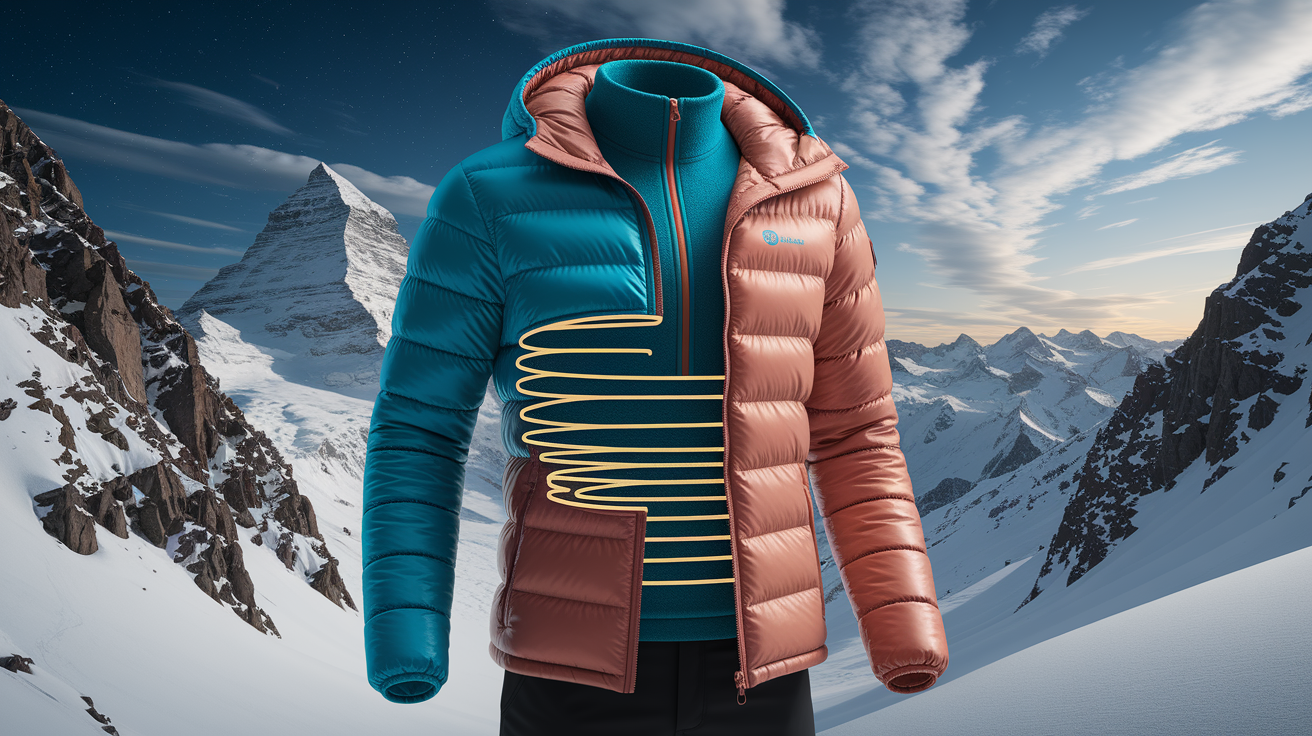
Fleece is your default midlayer for active trekking. Lightweight, breathable, moisture-wicking, and functional even when damp. A 200–300 weight fleece jacket worn over a base layer handles most movement from −5°C to 5°C, and you can add or remove it quickly as your body heat changes. Fleece compresses reasonably well and dries fast if you’re caught in light snow or drizzle.
Down jackets step in when you stop moving or temperatures drop below −10°C. A 600–900 fill down jacket provides serious warmth for −5°C to −20°C depending on how you layer it. Down compresses smaller than fleece, weighs less for the warmth it provides, and lasts for years if you keep it dry. The tradeoff? Down loses almost all insulation when wet, takes forever to dry, and costs more. Synthetic insulation is the fallback. Slightly heavier and bulkier than down, but it retains warmth when damp and works on tighter budgets.
For summit pushes or camps at extreme altitude, bring an expedition parka rated for −15°C to −30°C. These heavy-duty jackets use high-fill down (700–900+), weatherproof shells, insulated hoods, and longer cuts that cover your hips. You won’t wear it while trekking. Too warm. But when you’re sitting at 5,500 meters waiting for weather to clear, that parka becomes your survival layer.
Outer Shell Protection for Wind, Snow, and Extreme Cold

Your outer shell is the barrier between you and everything the mountain throws at you. Wind, snow, sleet, and the kind of cold that finds every gap in your layering system. A waterproof breathable jacket (Gore-Tex or equivalent) with fully taped seams keeps precipitation out while letting moisture vapor escape so you don’t soak yourself from the inside. Size it slightly larger than your normal jacket so it fits comfortably over your base layer, fleece, and down jacket without restricting arm movement or riding up when you reach overhead.
Rain jackets outperform ponchos at altitude. Ponchos are lighter and cheaper, but wind turns them into sails and snow blows underneath. A fitted shell with adjustable cuffs, a helmet-compatible hood, and a two-way zipper gives you real wind protection and fine control over ventilation. Pair the jacket with waterproof shell pants that have full-length side zips. You can pull them on over boots and crampons without taking anything off.
| Shell Type | Key Features |
|---|---|
| Hard Shell Jacket | Waterproof breathable membrane, taped seams, adjustable hood, pit zips, sized to fit over insulation layers |
| Hard Shell Pants | Full-length side zips, reinforced knees and seat, articulated fit for mobility, ankle gaiters or boot cuffs |
| Softshell (Optional) | Stretchy, wind-resistant, water-repellent; useful for dry cold but not a substitute for hard shell in storms |
High-Altitude Footwear and Socks for Ice and Snow
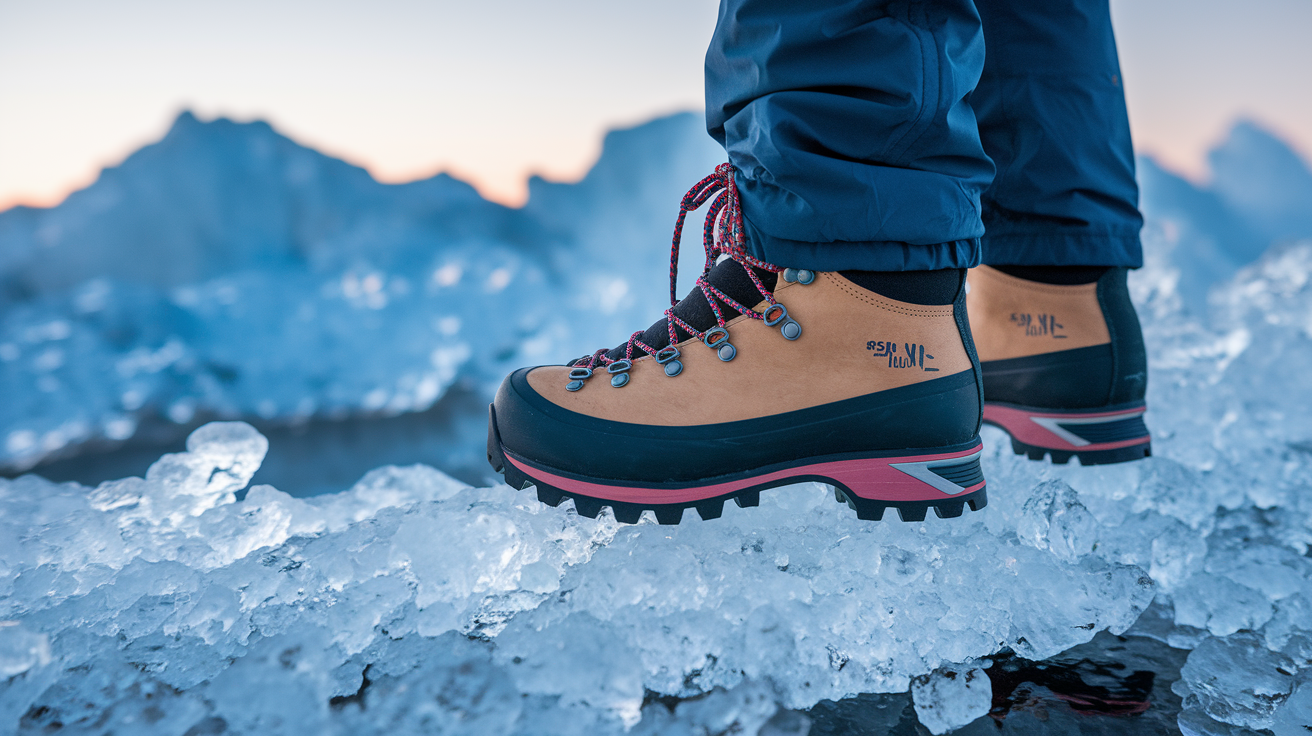
Insulated mountaineering boots are non-negotiable for sustained subfreezing travel above 3,500 meters. These boots use layered insulation, stiff soles that accept crampons, and waterproof/breathable membranes to keep your feet warm and dry on snow and ice. Order boots half a size larger than your normal shoe size. Thick socks and foot swelling at altitude need the extra room. Break in new boots on at least three full-day hikes before your trip. Blisters at 4,000 meters turn into serious problems fast.
Socks matter as much as boots. Pack 2–3 pairs of midweight merino wool trekking socks and one pair of heavyweight thermal socks for nights below −10°C. Merino regulates temperature, wicks moisture, and resists odor through multi-day wear. Avoid thick cotton socks. They hold sweat, dry slowly, and increase blister risk. Bring one pair of lightweight camp sandals or insulated booties so you can get out of your trekking boots at camp without exposing your feet to freezing ground.
Traction devices turn ice and packed snow from dangerous to manageable. Microspikes (light traction cleats with 6–8 small spikes) work for packed trails and moderate slopes. Full crampons (10–12 point steel frames) are required for steep ice, glacier travel, or technical alpine routes. Practice attaching crampons to your boots before your trip. Fumbling with straps in −15°C wind wastes time and increases frostbite risk. Gaiters seal the gap between your boots and pants to keep snow out and warmth in.
High-Altitude Footwear and Traction Essentials:
- Insulated mountaineering boots (order 0.5 size up, break in before trip)
- 2–3 pairs midweight merino wool trekking socks
- 1 pair heavyweight thermal socks for extreme cold
- Gaiters to seal boot-pant gap and block snow entry
- Microspikes for packed snow and moderate slopes
- Full crampons (10–12 point) for steep ice and glacier terrain
Hand and Head Protection for Subzero Mountain Environments

Hands lose heat fast at altitude, and once your fingers go numb you lose dexterity for critical tasks like adjusting gear, opening zippers, or using trekking poles. A three-layer glove system gives you options: thin fleece liner gloves for camp tasks and moderate cold, insulated waterproof shell gloves for active trekking in wind and snow, and heavy down mittens for sitting still in extreme cold or summit pushes. Liners dry quickly and pack small. Shells protect from wind and wet. Mittens keep fingers together to share warmth when temps drop below −15°C.
Your head radiates significant heat, and a proper beanie that covers your ears makes the difference between comfort and constant cold stress. Wool or synthetic beanies work. Down to −10°C a simple knit hat is enough, but below that or in high wind consider a balaclava or neck gaiter that covers your face and neck. Sun exposure at altitude is brutal. Bring a wide-brim sun hat with neck protection for daytime travel and swap to your beanie as soon as the sun drops or wind picks up.
Hand and Head Protection Checklist:
- Insulated down or synthetic mittens for extreme cold (−15°C and below)
- Fleece liner gloves for dexterity and moderate cold
- Waterproof insulated shell gloves for active trekking in wind/snow
- Balaclava or neck gaiter for face and neck coverage
- Wool or synthetic beanie that fully covers ears
Sleep Systems and Shelter for High-Altitude Cold Climates
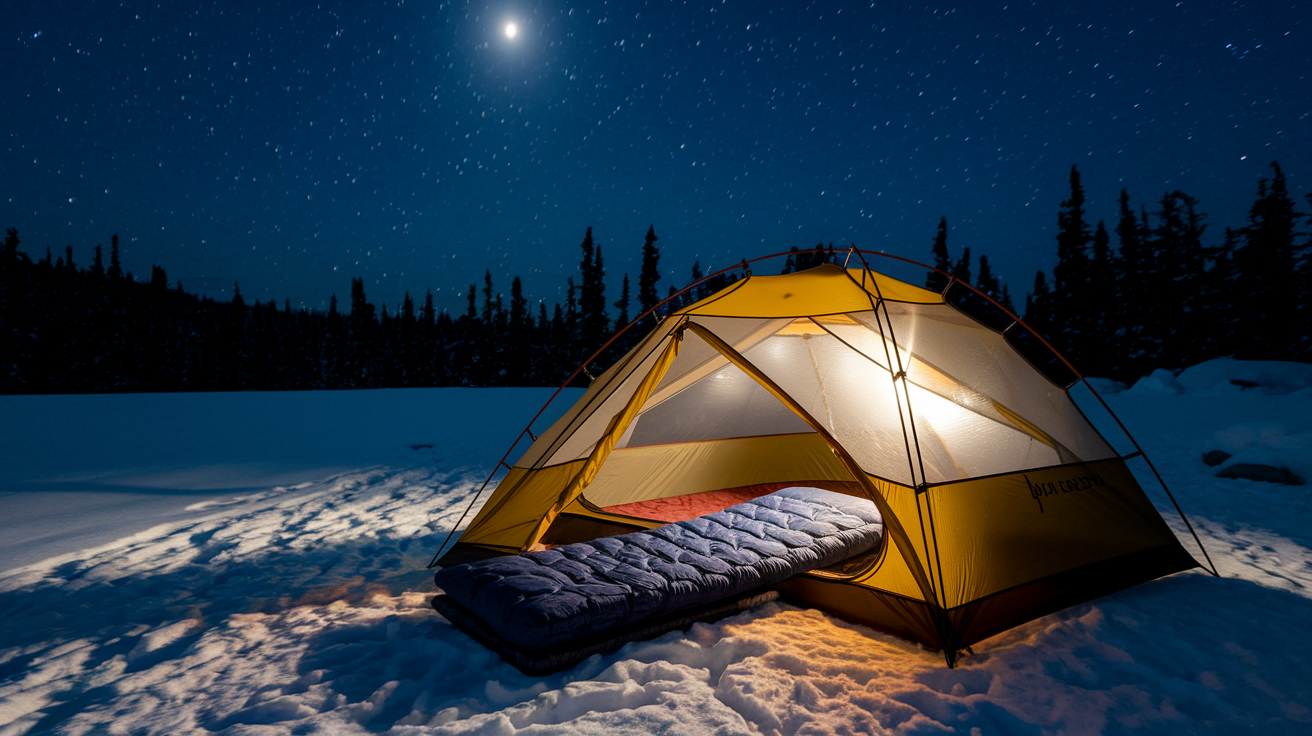
Your sleeping bag’s temperature rating is the single most important number in your sleep system. Match the rating to the coldest night you expect, then subtract 5–10°C for a safety margin. If you’re camping at 4,500 meters where temps hit −20°C, bring a bag rated to at least −25°C or −30°C. Down insulation provides the best warmth-to-weight ratio and compresses smaller for packing, but loses all insulation when wet. Synthetic insulation weighs more and packs larger, but retains warmth when damp and costs less. Mummy-shaped bags trap heat better than rectangular bags. If you’re camping in serious cold, mummy is the only shape that makes sense.
Your sleeping pad matters almost as much as your bag. Cold ground pulls heat out of your body all night, and insulation underneath you compresses under your weight and stops working. Use an insulated sleeping pad with an R-value of at least 4.5 for snow camping. Higher R-values provide more insulation. Closed-cell foam pads are indestructible and always insulate, but they’re bulky. Inflatable insulated pads pack smaller and are more comfortable, but they can puncture. Bring both if you have room, or at minimum carry a patch kit for inflatable pads.
Four-season tents are built to handle snow load, high wind, and sustained cold. Look for strong pole systems, low profiles that shed wind, vestibules for gear storage, and waterproof floors that seal out moisture. Practice setting up your tent in daylight before you need to pitch it in a storm at dusk. Keep your sleeping bag in a waterproof stuff sack inside your pack, and never let it get wet. A soaked sleeping bag in subzero temps is a life-threatening emergency.
| Gear Item | Temperature/Rating Guidance |
|---|---|
| Sleeping Bag | Match rating to coldest expected night minus 5–10°C safety margin; down for dry cold, synthetic if moisture risk |
| Sleeping Pad | R-value 4.5+ for snow camping; closed-cell foam = durable, inflatable insulated = packable and comfortable |
| Four-Season Tent | Strong poles, low wind profile, waterproof floor, vestibule for gear; practice setup in daylight |
| Sleeping Bag Liner (Optional) | Adds 5–10°C warmth and keeps bag clean; silk or synthetic |
Hydration and Food Planning for Subfreezing High Altitude Conditions

Staying hydrated at altitude is critical. Dry air, increased respiration, and cold all accelerate fluid loss. Carry 2–3 liters of water capacity at all times, but the challenge is keeping it from freezing. Insulated water bottles with neoprene sleeves work well. Store them upside down so ice forms at the bottom and you can still drink from the top. Hydration bladders are convenient, but hoses freeze quickly in subzero temps. If you use a bladder, insulate the hose, blow water back into the reservoir after each sip, and tuck the hose inside your jacket between drinks.
A vacuum-insulated thermos (1 liter) filled with hot water, tea, or broth gives you warm fluids all day and doubles as an emergency heat source. Fill it every morning before you leave camp. At night, store water bottles inside your sleeping bag or jacket to prevent freezing. A frozen bottle at dawn means you start the day dehydrated. If a bottle does freeze, thaw it inside your jacket while you’re moving. Your body heat will melt it faster than leaving it in your pack.
High-altitude travel burns serious calories. Cold exposure and physical exertion at elevation can push daily energy needs past 4,000 calories. Pack calorie-dense foods that stay edible in the cold: energy bars, chocolate, nuts, dried fruit, cheese, salami. Freeze-dried meals work well for camps where you can boil water, but bring a stove and fuel rated for high altitude and cold temps (canister stoves with isobutane blends or liquid-fuel stoves). Keep snacks accessible in jacket pockets so you can eat regularly without stopping to dig through your pack.
Hydration Anti-Freeze Techniques:
- Store insulated bottles upside down so ice forms away from the opening
- Insulate hydration bladder hoses and blow water back into reservoir after sips
- Keep at least one bottle inside your jacket while trekking
- Fill a 1L vacuum thermos with hot liquid every morning
- Store water bottles inside sleeping bag at night to prevent freezing
Altitude Safety Essentials and Monitoring Tools

Altitude sickness is a real risk above 2,500 meters, and it doesn’t care how fit you are. The only reliable prevention is slow ascent. Plan one acclimatization rest day for every 600–900 meters of elevation gain above 2,500 meters. A pulse oximeter (small clip-on device that measures blood oxygen saturation) gives you objective data on how your body is handling altitude. Normal oxygen saturation at sea level is 95–100%. At 3,500 meters, 85–90% is common. Watch for sudden drops or readings below 80%, and pay attention to symptoms: headache, nausea, dizziness, shortness of breath at rest, or trouble sleeping.
Carry a small supply of personal medications and any altitude-specific drugs your doctor recommends. Acetazolamide (commonly known by the brand name Diamox) is often prescribed to prevent acute mountain sickness. Typical prophylactic doses are 125 mg twice daily or 250 mg once daily, but you must consult a physician before use to confirm dosing, suitability, and potential side effects. Pack all medications in waterproof bags with clear labels. If someone in your group shows signs of serious altitude illness (confusion, difficulty walking, severe headache that doesn’t respond to rest and medication), the only treatment is immediate descent.
For expeditions above 5,000 meters or remote routes far from rescue, consider portable oxygen systems and emergency evacuation plans. Supplemental oxygen can stabilize someone with severe altitude sickness long enough to descend safely, but it’s heavy and requires training to use correctly. Know your evacuation options before you go. Helicopter rescue may not be possible in bad weather, and ground evacuation from 5,500 meters takes days.
Altitude Monitoring and Safety Gear:
- Pulse oximeter to track blood oxygen saturation and acclimatization progress
- Altitude medication planning with physician consultation before departure
- Portable oxygen cylinder and regulator for extreme-altitude expeditions or emergencies
Navigation, Communication, and Lighting in Extreme Cold
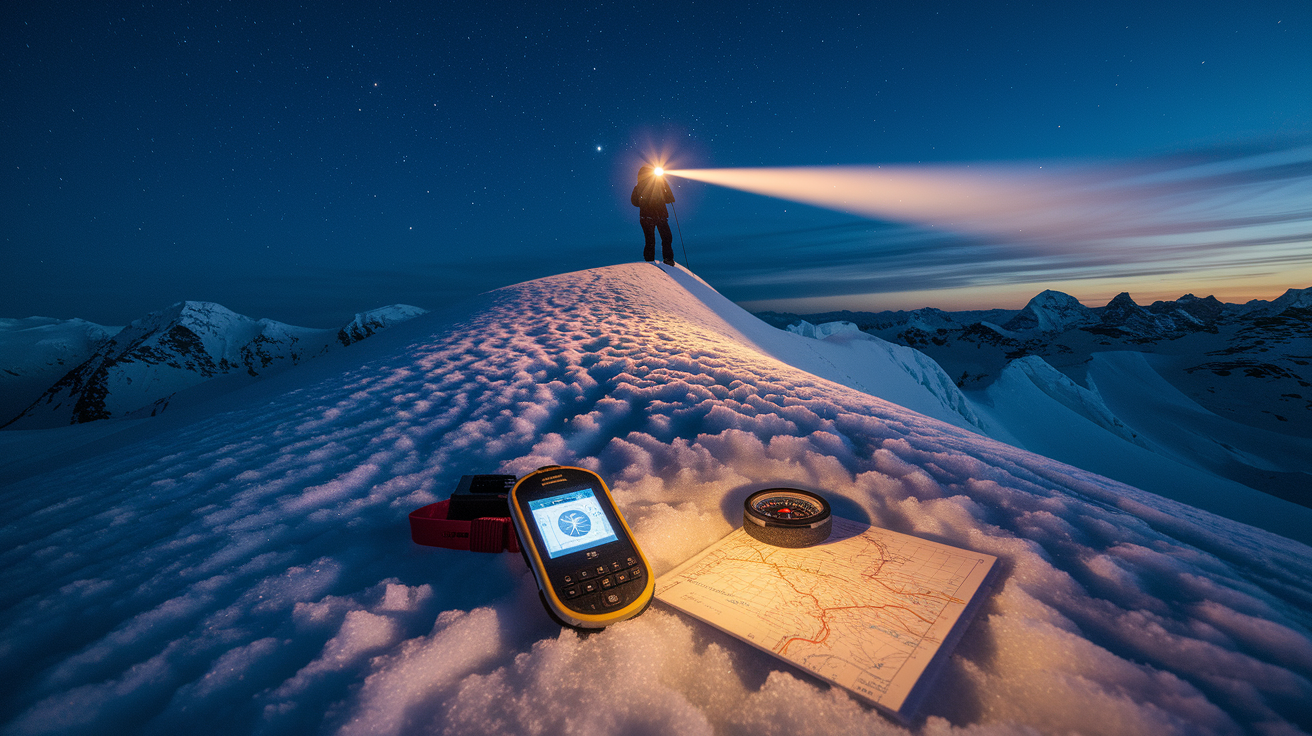
GPS devices with offline maps are essential above treeline where trails disappear under snow and landmarks become hard to identify in whiteout conditions. Download detailed topographic maps for your entire route before you leave cell coverage, and carry a backup paper map and compass. Electronics fail, batteries die, and screens freeze. Practice basic map-and-compass navigation before your trip so you can find your way if your GPS goes down.
Satellite messengers or personal locator beacons (PLBs) are non-negotiable for remote high-altitude travel. These devices work anywhere on earth and let you call for rescue when you’re days from the nearest road. Satellite messengers also allow two-way text communication so you can update your support team or get weather forecasts. Test your device before you leave and make sure your emergency contacts know how to respond if they receive a distress signal.
Cold drains batteries fast. Lithium batteries perform better than alkaline in freezing temps, but even lithium loses capacity below −10°C. Bring a headlamp rated for cold-weather use with long battery life (at least 100 hours on low setting), and carry spare batteries stored inside your jacket to keep them warm. A small backup flashlight gives you redundancy if your headlamp fails. Charge all devices fully each night, and keep power banks inside your sleeping bag so they stay warm and ready to use.
Repair, Emergency, and Rescue Gear for Alpine Conditions
Small gear failures become big problems fast at altitude. A broken tent pole, torn jacket, or punctured sleeping pad can turn a manageable situation into a survival emergency if you can’t fix it. Pack a repair kit with duct tape (wrap a few meters around a trekking pole), sewing repair kit with heavy thread, gear patches for tents and pads, spare cord, and a multi-tool with pliers and a knife. Practice common repairs before your trip. Patching an inflatable pad, splinting a tent pole with a trekking pole section. You don’t want to figure it out for the first time in a storm.
Carry an emergency shelter even if you’re planning to stay in tents or huts. A lightweight bivy sack or emergency space blanket weighs almost nothing and can save your life if you’re caught out overnight or need to shelter someone with hypothermia or altitude sickness. Emergency shelters are one-time-use backups, not replacements for proper tents, but they’re better than nothing when conditions go bad.
If your route crosses avalanche terrain, you need a transceiver, probe, and shovel, and you need to know how to use them. Avalanche rescue is a practiced skill. Taking a half-day course before your trip could save your partner’s life. Transceivers locate buried victims, probes pinpoint their exact location, and shovels dig them out. All three tools are useless if you haven’t practiced beacon searches and fast digging. Avalanche gear is specialized. If you’re traveling in avalanche terrain, get trained first.
| Tool/Device | Primary Use |
|---|---|
| Multi-Tool | Pliers, knife, screwdriver for gear adjustments and emergency repairs |
| Duct Tape and Patches | Quick fixes for torn fabric, broken poles, punctured pads; wrap tape around trekking pole |
| Emergency Bivy/Space Blanket | Lightweight emergency shelter for unexpected overnight or hypothermia treatment |
| Avalanche Transceiver | Locates buried victims in avalanche debris; requires training and practice |
| Probe and Shovel | Pinpoint exact burial location and dig out victim; essential avalanche rescue tools |
Packing and Weight Distribution for Multi-Day High-Altitude Expeditions
A well-organized pack makes the difference between efficient travel and constant frustration. Use a daypack around 30 liters for guided treks where porters or mules carry your main luggage, and a 60–70 liter pack for self-supported expeditions where you’re carrying everything. Separate gear into waterproof dry bags or stuff sacks by category. Sleeping system, clothing layers, food, electronics. You can find what you need without unpacking everything. Compression sacks reduce the bulk of sleeping bags and insulation layers, giving you more usable space.
Weight distribution controls how your pack feels after eight hours of trekking. Pack heavy items (food, water, stove, fuel) close to your spine and centered between your shoulder blades. Light bulky items (sleeping bag, insulated jacket) go at the bottom of the pack. Keep frequently accessed gear (snacks, water, shell layers, sunscreen, map) in outside pockets or the top compartment so you don’t have to dig. Adjust your hip belt and shoulder straps so the pack rides on your hips, not your shoulders. Your legs are stronger and can carry the load longer.
Test your full pack before your trip. Load it with everything you’re bringing, adjust the straps, and take it on a full-day hike. A pack that feels fine for 30 minutes can become painful after four hours if the weight distribution is wrong or the fit isn’t right. Make adjustments at home, not on the trail at 4,500 meters where you can’t easily swap gear or change plans.
Packing Organization Essentials:
- Compression sacks for sleeping bag and insulated layers to reduce bulk
- Waterproof dry bags to separate gear by category and protect from moisture
- Heavy items close to spine, light bulky items at pack bottom, frequent-use items in accessible pockets
- Test full pack on a long day hike before departure to verify fit and weight distribution
Final Words
You’re tightening boots and re-checking layers as the wind picks up. This guide walked you through the essentials: base layers, midlayers, shells, insulated pants, boots, sleep systems, hydration, altitude safety, navigation, repair gear, and how to pack it all.
Use this packing list for high-altitude cold climates as a short, actionable checklist: base/mid/outer layers, insulated pants and boots, warm gloves and headwear, cold-rated sleep system, insulated hydration, safety and repair tools, and smart pack organization. With these items and a clear plan, you’ll stay warm, safe, and ready for the mountain.
FAQ
Q: Why is layering essential at high altitude?
A: Layering is essential at high altitude because temperatures, wind, and sun change fast; layers let you add or remove insulation, control sweat, and stay protected during both hard effort and rest.
Q: What base layer fabric and weight should I pack?
A: You should pack merino or synthetic base layers, with midweight merino (150–260 g/m²) for roughly 0°C to −15°C; synthetics dry faster and cotton should be avoided.
Q: How many base layer sets do I need and should I bring night thermals?
A: You should bring 2–3 base layer sets plus one extra pair; night thermals are useful—wear the driest set at camp and rotate to keep sleeping warm and dry.
Q: How do I choose midlayers—fleece, down, or synthetic?
A: Choose fleece as a breathable trekking midlayer, down for light high warmth at camp, and synthetic when wet conditions or budget make moisture resilience the priority.
Q: When should I carry an expedition down parka?
A: You should carry an expedition down parka when temperatures may fall below −15°C or during long exposed waits; use it for camp and summit stops, not continuous high-output hiking.
Q: What shell jacket features matter for wind, snow, and helmet use?
A: You should pick a waterproof breathable shell with taped seams, a slightly roomy cut to layer under, a helmet-compatible hood, and solid wind protection for alpine conditions.
Q: What footwear, sock system, and crampon choices work for alpine snow and ice?
A: You should use insulated mountaineering boots half a size up, break them in, pack 2–3 merino sock pairs with thin liners, 10-12 point crampons for technical ice, microspikes for packed snow.
Q: How do I pick sleeping bag and pad ratings for cold camps?
A: You should match your sleeping bag to the coldest expected night (−10°C to −30°C); prefer down for light warmth, synthetic if damp risk, and a sleeping pad R-value 4.5+ on snow.
Q: How do I stop water and hoses from freezing in subfreezing conditions?
A: You should use insulated bottles or an insulated bladder with hose cover, carry 2–3 liters, keep bottles inside your jacket overnight, and tuck hoses under layers after sipping.
Q: What altitude safety gear and monitoring should I pack?
A: You should pack a pulse oximeter, plan altitude medication with a clinician, consider supplemental oxygen if needed, and schedule acclimatization days every 600–900 m above 2,500 m while watching for AMS symptoms.